
Aluminum boat transoms resist oxidation and corrosion but they may loosen over time, so it is necessary to promptly reinforce a transom on an aluminum boat.
Effective Jon boat rebuild prevents weakend transoms that affect boat’s integrity and safety. Learn the solid tips in this tutorial to master how to reinforce a transom on an aluminum boat, including aluminum boat transom modification, plus:
- Things to include in an aluminum boat transom repair kit, such as a Jon boat transom plate, and
- Effective guide to reinforce a boat transom.
Read on to know more about a Jon boat transom reinforcement.
Table of Contents
Things to Include in an Aluminum Boat Transom Repair Kit
1. Intended use of the boat
Know beforehand your intentions for your aluminum boat so you can check, secure, or reinforce a reliable transom setup. Boat transoms have a vital role in strengthening the vertical structure of a boat’s stern that you should know.
Determine what type of outboard motor you will choose for your power driven boat to design the right transom height. When you intend to have a fast craft your transom height will influence the performance of your motor propeller. As you mount it in a trailer and go hunting, your transom stability eases up towing and camouflaging your boat.
Always consider the boat’s purpose along with the proper materials, equipment, and tools for your transom rebuilding kit. Whether it’s for a permanent fix, lightweight results, or easy maintenance, it leads to safety and longer boat service time if you know your boat usages. Enabling your boat’s stern with a strong bea that deals with external pressure, extreme environment, and rough waters.
2. Materials, equipment, and tools
Ensure your transom rebuilding kit includes stainless bolts, lock nuts, washers, rivets, coated steel, welding rods, paints, adhesives, and sealants. Consider hardwood, plyboard, plastic, fiberglass, aluminum plate, PVC, plastic, polycarbonate, fiberboard, and other synthetic transom reinforcement materials as well.
You should have a few sandpaper or discs, handrills, drill bits, grinding or cutter, portable welding set, and gears. Marine epoxy sealants and other adhesions are great for fast or regular permanent curing suitable for an aluminum boat.
Marine-grade sealants like 3M M5200 influence the lifespan of any reinforcement to prevent leaks, which weakens the transom support. A few small tools like a hammer, open-socket wrench, and screwdriver are useful for your aluminum boat transom reinforcement.
I mostly use aluminum or fibreboards for boat repairs as they last for extended periods against corrosion, oxidation, and rust. Aluminum sheets are reliable and easy to use in fixing the transom of my kayak and another wooden canoe.
3. Reliability
Aluminum materials are engineered with high-resistance elements to oxidation and corrosion to provide safer and stronger boat beams and transoms. Though aluminum transoms are impermeable to rust, leaks, and moisture, they may be weakened when using non-marine-grade or bare aluminum.
Consider aluminum sheets as reinforcement materials to repair or replace your boat transom based on the boat’s intended use. Get materials that help a boat stand up for a more permanent reinforcement against cracking, abusive use, or harsh environments. They can step up your boat’s reliability while making it strong and lightweight for a better boating performance.
Effective Guide to Reinforce a Transom on a Boat
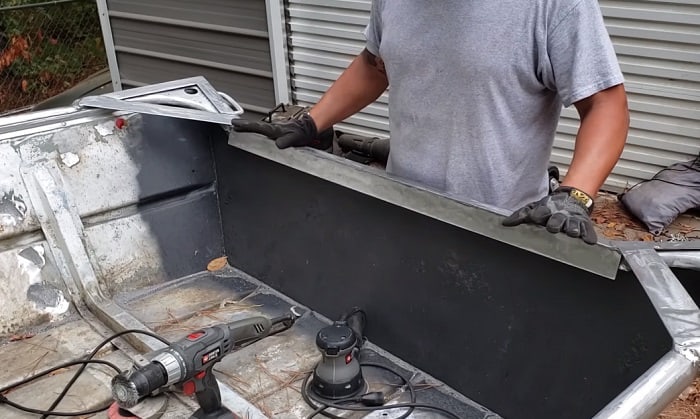
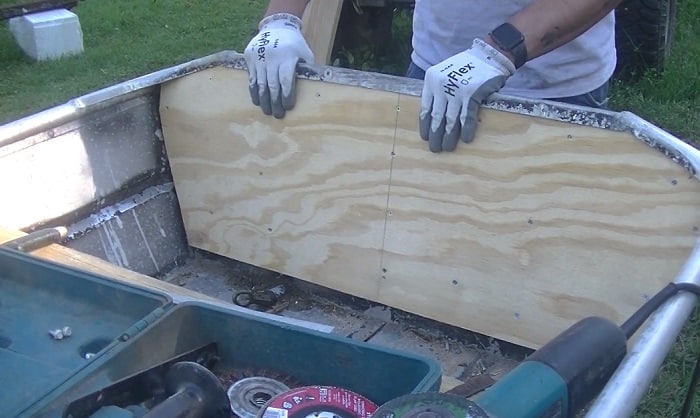
1. Preparing the transom section
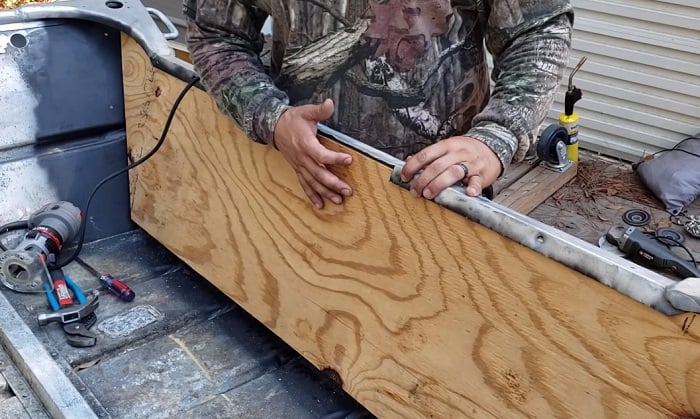
Check the area to fix or replace and measure the dimension of the transom section. You can clamp your replacement material in the specific section and ensure it fits the location.
It’s better to use the same material as the guide and put markings to layout the rebuilding process. Trim and polish rotted or damaged areas of the transom, or remove the entire weakened section for full reinforcement. Drill guide holes on the marked transom sections for easy steps of putting bolt and rivets or sealing them easily. Guide markings will also help check the width and height enough for the motor and stern fixtures of your boat.
2. Polishing the transom reinforcement
Take the guide (or plate) off and do final cleaning before the sanding and gluing or sealing applications. Use specific sanding discs or sandpapers in polishing or reinforcing transom surfaces and back of the reinforcement material for best results. Apply the adhesive tape or sealant once all sides or sections of the transom surfaces are clean and polished.
The 3M M5200 adhesive tape and other equivalent marine epoxy sealant are good for all mounting surfaces. Apply the sealant evenly to the surface, including the back of your reinforcement material before reinforcing or rebuilding your boat transom.
3. Installing transom reinforcement
Follow the guide holes or markings as you fit the transom reinforcement to its designated section. Clamp the transom reinforcement and start screwing in the stainless lock nuts, washers, or rivets to bolt it.
Tighten all the bolts and allow the reinforcement to stay clamped for about a week to complete the curing. When using plastic fiberboards, polycarbonate or PVC and plyboards, check for hair-like gaps for second sealant applications. Finally, clean all the messy sections.
4. Installing transom add-ons to your reinforcement
Double check for add-ons, especially when you are welding or riveting the transom reinforcement. Transom add-ons like rope-hooks, stepboard, outboard wedges and other mountings can positively impact your boat stern if done right.
Ensure wedges are in place to ease out porpoising and light bow for a smoother stride. Another good add-on is providing fittings for a transom saver. It will prevent stress to the transom, engine and hull of your boat. An aluminum base plate allows you to attach your motor and prevent cracks from your transom and stern beam.
5. Boat transom prevention tips
Here are a few helpful tips to protect your transom from harsh or abusive environments:
- Get a floating boat-lift to dry-dock your boat when you have the budget. The more time your aluminum boat is off the water when not in use, the better it is for the transom.
- Use paint and coatings designed for use with aluminum surfaces. Anodes or base plates should not have paint or coats to prevent cracks or scratches that weaken the transom.
- Follow other recommended practices from boat owners, including the care and maintenance of aluminum boats.
6. Proper boat maintenance
- Ensure that you always wash and clean your boat of saltwater or marine deposits after each use.
- Fix or replace any damages that can expose the aluminum boat surfaces to corrosion and oxidation.
- Avoid mixing aluminum with other metals and corrosive solutions on your aluminum boat.
- Exclude the use of an automotive-type battery charger on your boat.
Here’s a few insights to check on aluminum transom reinforcement and strengthening a boat transom. Check this YouTube video for a step-by-step aluminum boat transom repair by Tiny Boat Nation.
Conclusion
You have learned easy and simple ways on how to reinforce a transom on an aluminum boat from this tutorial. The key takeaway is to always use high-quality reinforcement materials to effectively and quickly repair a weakened aluminum boat transom. Plus, do regular checks and reinforce your aluminum boat transom to protect it from corrosion and oxidation.
If you follow what you have read, you will be able to strengthen the transom of your aluminum boat to make every boating trip longer and worthwhile.

“My intention from the first day establishing Boating Basics Online is to provide as much help as possible for boaters who want to experience a first safe and convenient trip. So feel free to join us and share your beautiful journeys to the sea!”