
The ways on how to remove boat decals are usually needed when buying a used boat. Decals and stickers will deprive your boat of that brand-new look. They stick firmly on the surface, and getting rid of them may be laborious.
However, you can remove them without scratching the hull as long as you do it carefully with the right tools and products. Whether you have a boat made of fiberglass, aluminum, or wood, you can apply the following procedures.
This article will guide you throughout the whole process. So it will no longer be inconvenient to change decals.
Table of Contents
How to Remove Boat Decals: 3 Methods
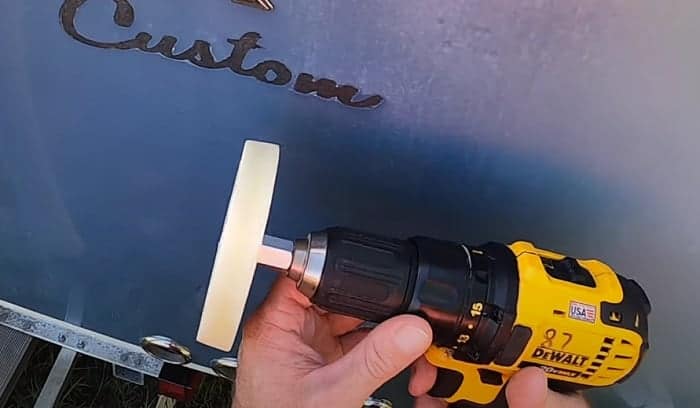
1. With an Eraser Wheel
The eraser wheel should be attached to a drill when utilized to remove decals. You may find this in auto body shops as it’s used for taking off bumper stickers and pinstripes.
Hence, it’s the best choice if you want to make decals as well as out-of-state registration tickets or stripes to disappear. Some boaters think of this as an easy option with advantages.
You’ll like how it doesn’t incorporate harsh chemicals, high pressure, and intense heat. Unlike when you carry on other methods, you don’t have to be extra careful because of harmful substances. It also means that you’re far from damaging your boat.
Know that there will be residue from the eraser wheel on the decals you’re trying to remove. The scenario is similar when you erase something on paper with a pencil eraser. Don’t worry since the particles can be removed with ease.
2. A Heat Gun or Hair Dryer
Loosening decals for easy removal can be done with the help of a heat gun or hairdryer. In addition, you’ll need razor blades or scrapers. Still, do the scraping gently.
You have to be extra careful when you’re handling a heat gun. It’s deemed effective in making decals gone, but it can cause damage at the same time. Therefore, just use it once you have the right skills. If not, you’re better off with a hairdryer.
Utilizing either of these two tools will begin with warming the surface where there’s a decal you want to remove. Keep on using the tool until it becomes flexible. When using a heat gun, you only need a low setting to finish the job.
Be careful during the scraping process. A single mistake can create unpleasant gashes on your boat. If you have doubts about the movements of your hand, you can opt for a plastic blade.
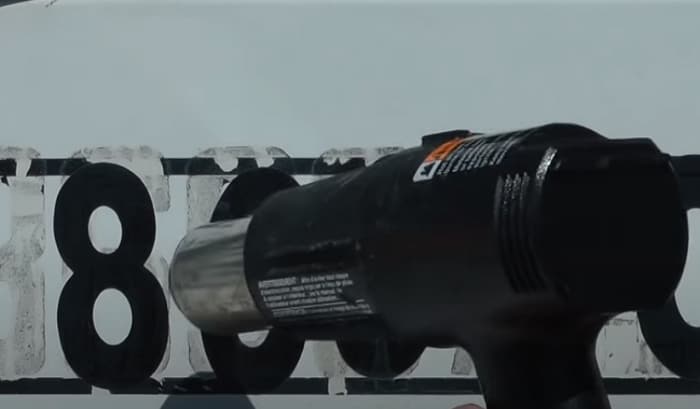
3. Pressure Washer with Hot Water
The hot water from a pressure washer can soften the decals or loosen some stickers. Moreover, the force from the washer can help strip any residue away. However, don’t start hard when it comes to applying the pressure.
It’s better to commence with small, inconspicuous sections. While doing it, you have to look closely if ever the washer harms your boat. What you’ll exactly do is start with a low setting, then you can take it to medium.
Let the water reach the decal and its surrounding part. The next thing you’ll know is that you’ve successfully dislodged it!
Based on the above explanation, a power washer is effective and safe. Sadly, it can’t be the choice of many. The main reason is that you can’t just spot it lying everywhere. Some would need to find an establishment that rents it out or purchase it.
Other Considerations And Precautions

While a pressure washer needs to be bought or rented, a hairdryer and razor blades can be just around your house. Buying an eraser wheel and scraper is not a burden as they are at an affordable price.
You can choose one that’s convenient for you. The good news is that all of the methods are great on any material.
Clearing Your Boat Of Residue And Shadowing
Sad to say but the last step is not the removing of decals. You still have to clear out residue and shadowing on your boat. It’s best to get rid of them before you lay down the other decals and trackers that you prefer.
- Dealing with Residue
After peeling off the decals, expect adhesive residue left on the surface. This leftover can attract dust and tiny particles. If it happens, it will trap moisture which tolerates the formation of mold and rust.
Even though the residue is nowhere to be seen by the naked eye, it’s still necessary to do some clean-up. There will always be some tiny particles that are almost invisible left after peeling the decals. What’s best to do is to use an effective adhesive remover.
Some examples are Goo Gone Adhesive Remover, 3M Bumper Sticker Adhesive Remover, and Rapid Remover. You may also try adhesive remover wipes from UNI-SOLVE.
But if you’re dealing with stubborn, obvious residue, you have to use the right kind of solvent. You may use a general-purpose adhesive cleaner like 3M General Purpose Adhesive Remover.
Some use isopropyl alcohol and WD-40 Multi-use products for this task. It’s wise to have a spot test on a small area first, even if you use a safe cleaner. Better be sure than sorry that no discoloration or other sort of damages will be on your boat.
When you need to clear a lot of residues, this process should be repeated. It’s also good if you allow the adhesive remover to stay on the surface much longer before scraping. Some residue requires more time to break up.
Another step should be done after clearing out your boat with residue. Don’t be wary of cleaning your boat again with a cleaner solution like Boat Juice Exterior Cleaner, Oxy Solve Total Outdoor Cleaner, and Star Brite Instant Hull Cleaner.
It’s to ensure that no invisible residue has passed through your meticulous cleaning. Make sure that you choose safe solutions for your vessel.
- Not Allowing the Shadowing from Lingering
With the steps mentioned above of removing every bit of residue, you will be ready to customize your boat. Don’t get too excited as you have to see if the boat remains in its even color. If not, it means shadowing has occurred on your boat.
This effect because decals had been on the boat for a long time and the frequent sunlight exposure. When the shadowing is not too dark, it simply means that the decals have not been on the surface for a long period.
Well, there’s something good with the sunlight in this matter. You’ll have to put your boat under the sun for your boat to return to the same color. Take note that this is only applicable for minor shadowing.
The necessary process is more demanding when it comes to decals that have been on the surface for several years while being exposed to harsh sunlight. You may also find decals that swelled with a discolored and uneven appearance.
You need to wet, sand, and buff the area of the old decals. These procedures won’t only eliminate shadowing, but they can make the surface flatter. You may also avail detailing service for this concern or do it yourself.
Some buffing solutions will help you, such as 3M Buffing Compound Hand Glaze and Meguiar’s Oxidation Remover.
Does Boat Material Matter When Removing Decals?
You won’t have a hard time finding an adhesive remover that suits your boat. Most of this product is formulated for all kinds of materials such as wood, metal, aluminum, fiberglass, and even glass.
When working, you shouldn’t only focus on the decals but also be mindful of the surface, not to harm it. It’s given that glass is vulnerable, and it’s also in the same condition when you remove decals from it.
Since you need to be careful, just allow the adhesive remover to do most of the job. Be patient when waiting for progress. Peeling the decal would require spraying of the remover from every step of the way with pauses to give it time to work.
Pinch the decal first before you use a scraper. Use this gently and don’t be in a rush.
Putting On New Decals
By applying the right steps on how to remove boat decals, it’s not a problem to put new ones. This guide has also shown the suitable tools and products that can complete the procedures. You’ll be able to clear out every bit of residue and shadowing!
It will be much better if the surface is clean before putting in new decals. Thus, be patient to go through every process.

“I am James Harvey – founder of Boating Basics Online. It is established with the drive to help out first-time boaters, which are those desiring to explore their way through the water. So if you are new to boating, start from here with me. “