
The way to ensure that you’ll have a hefty catch with your fiberglass boat is by adding a fishfinder. But, for it to work, you will also need to install a transducer.
If you have a brand new fish finder, you need to know the essential steps on how to mount a transducer on a fiberglass boat. Installation should be well arranged so readings delivered to the fishfinder will be accurate despite the speed.
If you don’t know where to start, this article will show you every step from setting up the fishfinder to mounting the transducer.
Table of Contents
How To Install A Fishfinder On Fiberglass Boat
The first thing that you have to focus on is the binnacle mount when installing a fish finder. Here are the steps to follow:
Step 1: Location
The ideal location for the fish finder is viewing it from the cockpit. You have to ensure that there’s enough amount of space on the underside or the back. A tape measure will help you figure out the available space.
You also have to check the power bus if there are terminals. So, you can plug in your electronic devices.
Step 2: The Mounting Holes
You’re supposed to measure twice or cut once before drilling the mounting holes. To create smooth holes, you have to apply full, confident speed. Taking it slow won’t give the best result.
Step 3: Wiring Up
The fish finder needs the energy to work. Therefore, you have to take care of the wires. Start by looking for existing holes to connect the wires to the fishfinder. If there aren’t any, you’ll have to drill some behind the mount.
Step 4: Powering a Fishfinder
Insert the power leads through the holes behind the mounting area. Arrange the plug with just enough slack because you have to reserve some space for the wires.
You can secure the wires by using clamps or tie-wraps. These support hardware should be added for every one and a half feet wire length. However, it may require more work.
For instance, there’s a need to add female connectors with the male ones on a fuse block. There will be chances that you need to make the wires shorter or longer. But, never cut the in-line fuse as it can nullify the warranty and destroy the unit.
Step 5: Wrapping Up the Installation
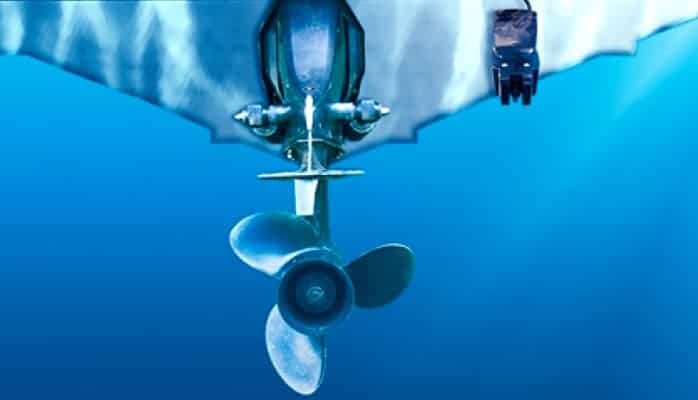
The transducer should be mounted horizontally with the exact balance. It is alright to wiggle it to check if it is in the best position. Mark the mounting holes and run the wires through the dash.
Next, you have to secure the wires with the help of clamps. It’s best not to cut the cable for a good performance of the fishfinder. After drilling the holes, you have to seal them. In addition, have the inside of the transom holes covered with a sealant or adhesive.
Finish off the mounting by screwing and make sure you created a waterproof seal.
Installing A Transducer On Fiberglass Boat
Place the transducer around 1/16 inch under the hull’s extended waterline. Then, execute each step.
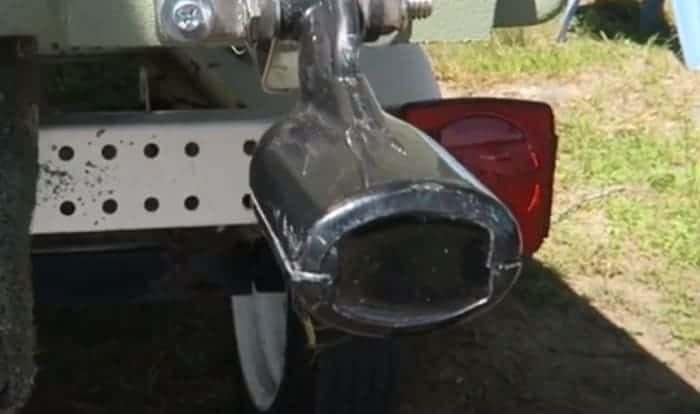
Step 1: Drilling the Transom
Mounting the transducer on a fiberglass boat will require you to focus on the transom and bottom joint. These parts are heavily constructed but drilling the holes can be handled with ease.
You only have to be careful in maintaining the watertight sealing. It can happen when you apply a reliable watertight sealer on the stainless screws.
Step 2: The Deadrise
When the transducer sits on the transom, its other side is three-quarters of an inch while it’s 1/16 inch under the extended waterline. It doesn’t have to be shallow or too deep. Thus, it needs to be at the right height to prevent it from losing the signal.
Step 3: Setting Out the Cable
You need to drill a big hole to set out the cable. It should be above the waterline. Selected brands would allow you to cut the cords to the electronics box aft bulkhead making it easier for you. But it’s not allowed by some models.
The cable should be secured to the transom and set it out in the direction that goes to the section where it will be displayed. You don’t have to worry about the hardware because it is included in the packaging when purchasing a transducer.
When forwarding the cable to the center console, it goes through a rigging tube that usually carries wiring and engine controls. You can find it stuffed with several other things. So, there’s only little room for a terminal end.
In this situation, you’ll need a pull wire in the form of an old cable or electrician’s snake.
Step 4: When it’s Possible to Cut the Transducer Cable
If it’s hard to deal with the large terminal end because of the tons of objects in the rigging tube, you may cut the transducer. Once again, do it if it’s allowed by the manufacturer!
You should know how to reattach wires. To make the wires slide through the tube to reach the console, you can get help from liquid soap.
Step 5: Reconnecting Cable
A transducer has several conductors, which may be insulated or not. When attaching the wires, you can twist each pair with the same color then solder to lock them. You may also get to secure them.
Thru-Hull Transducer Installation
Through hull transducer mounting will go smoothly with standard fairing when you follow these steps.
- Drill a hole inside the hull, keeping in mind that it should be perpendicular to the waterline. You have to do it outside if there’s a strut or rib.
- Be wise to drill reversely for scoring the surface. This method won’t chip the gel coat. Then, you can drill in the forward direction.
- Clean the area that you drilled so the sealant will adhere well to the surface. Use a weak solvent like alcohol or mild household detergent before sanding.
- Tape the hull’s section where you drilled a hole. When you dry-fit the transducer, outline its mushroom head on the tape. You have to make a hole in the tape by using a utility knife or something sharp.
Clearing out the debris will assist you in putting the sealant after you’ve twisted the transducer nuts.
How To Cut the Fairing Part
Start by measuring the angle of the deadrise when placed in the selected location. Once you get the desired angle, tilt the bandsaw table while securing the cutting barricade. The cutting jig should lean on the cutting fence when the fairing is on the table.
The pointed end should either be away from the portside or projecting towards the starboard. You have to cut the fairing to the thinnest dimension, preferably half an inch.
You have to allow the fairing to adapt with the hull by allowing a power tool or rasp to work on it.
Sum It Up
By following the steps in this article, the result on how to mount a transducer on a fiberglass boat will be guaranteed! You can either do it on the transom or the hull. It will depend on the transducer’s design.
Correct mounting of the transducer is vital for the fish finder to work well. It should be mounted precisely to gather data efficiently and to gain benefits from the fish finder.

“I am James Harvey – founder of Boating Basics Online. It is established with the drive to help out first-time boaters, which are those desiring to explore their way through the water. So if you are new to boating, start from here with me. “