
It is terrifying when your boat’s battery suddenly dies while sailing. That’s where the benefit of adding second battery to boat comes in.
When a dual battery setup boat correctly fits, it allows you to connect two batteries in a boat. Enabling a boat dual battery switch provides continuous sailing after you hook up dual batteries in a boat.
In this tutorial, you’ll learn how to hook up two batteries in a boat diagram, including:
- The installation of boat battery hookup diagram
- Safety guides for boat dual battery wiring diagram, and
- Essential things for a dual battery kit for boat.
Table of Contents
What You Will Need to Follow in This tutorial

A. Supplies in connecting dual batteries in a boat
1. A second marine battery
The kind of battery you’ll need is determined by your boat’s particular power requirements. Auxiliary systems, such as navigation systems, lighting, and other energy-intensive applications, have thicker plates, ensuring that they offer dependable starting power and handle various loads.
2. Battery selector switch
Disconnecting the batteries helps to control the total usage of the electricity supply on board. They’re used to connect and detach electrical equipment from the main power supply and prevent battery depletion during idleness.
3. Battery box with a bracket or tie-down
The battery box is a small carrying container that provides protection to your battery. Such containment prevents water, oil, or other substances from seeping into the engine and causing it to fail. This is especially important if you use lead-acid batteries that may leak acid into your yacht upon failing.
4. Red and black 2/0 marine-grade cable
This marine cable is considerably finer; every single strand inside has thin wire stranding. This makes it extremely flexible, enabling it to survive in a moving, vibrating boat, while the tinned strands provide corrosion resistance. Plus, the varying colors help identify the cable to connect for positive and negative connections.
5. Crimped or soldered 2/0 marine-grade cable lugs
Always ensure the stripped and crimped end of a cable is inserted into a section of the connector terminal, which is then physically soldered or warped by compressing (crimping) firmly around the wire. Crimping is typically done using crimping pliers or other specialized crimping tools.
6. Seal cable-lug connections with heat-shrink tubing
Heat-shrink the wraps of an electrical cable or connector to provide a protective seal to your battery connections. It’s composed of a material that shrinks in size when heated, resulting in a tight closure. It protects wires, terminals, and connectors against water and abrasion in electrical operations.
7. Terminal caps for each positive battery terminal
These covers prevent the battery from arcing against the boat’s body or short-circuiting. These plastic, rubber, or any synthetic polymer caps can also protect the battery terminals against water and electrical contact.
B. Tools you’ll need to install the batteries
1. Cleaning brush for battery terminals
When cleaning battery rust on its terminal, you’ll need this. Easily place the brush and clean your battery’s positive and negative connections. You may also use it to clean the battery posts.
2. 10mm socket or combination wrench
You must first remove the battery before you can do anything with it. Completing this task requires a 10mm combination socket or wrench. To release the battery clamps, loosen the 10mm bolt.
3. Dielectric grease
This dielectric lubricant keeps the battery from corroding and safeguards the cell terminals. Dielectric grease is useful for your batteries to connect better. So, make sure you have this in your tool kit.
C. Consider the following essential installation factors:
1. Space
There should be physical space available. You can’t add a second one if there isn’t enough space. For your second battery, you may create a unique battery compartment. The essential thing to remember is that your secondary battery, like the first, must be safe and secure.
2. Wiring Up
Batteries must be compatible. Get a secondary battery that matches the first to prevent power distribution issues.
The length of all circuit routes should be the same. The old battery’s positive connection should be linked to it, while the new battery’s negative connection should be attached to it.
D. Precautions for Safe Handling
- First and foremost, make certain that the battery connections are disconnected from the wires. Keep in mind that batteries contain potentially hazardous substances. You avoid high-risk short circuits or electrocution by detaching the wires from the terminals.
- Only use the wires that are specified in the handbook, and be careful to observe the safety warnings.
- Make that the metal-to-metal contacts are in good shape. Check to see whether it’s clean. The terminals must be the correct size and watertight. To achieve low resistance connections, metal fasteners must be well.
- Instead of wingnuts, Hex or Nylock nuts should be used for outboard motor applications. It’s also a good idea to tighten the lock washers. Clamp-on battery terminals connected to the battery cable should be used for inboard applications.
- When working with arrays, gloves and goggles are a necessity. Make sure you have a water hose handy in case of acid spills on your face and you need to wash it off.
- Never operate near an open flame, and use uninsulated equipment with caution. Uninsulated tools may cause a short circuit, which may result in you being grounded.
Five Steps Installing and Wiring the Two Batteries
Step 1: Select the most appropriate battery switch for your boat
Make sure that the boat’s dual battery switch is built for two batteries and can withstand the current while starting the engine. For most outboards and/or gasoline inboards, a continuous rating of 250 amps is adequate. Switches with locks are available for further protection against boat thefts, and some include field disconnection circuits to safeguard the alternator if the batteries are turned off while the motor is working.
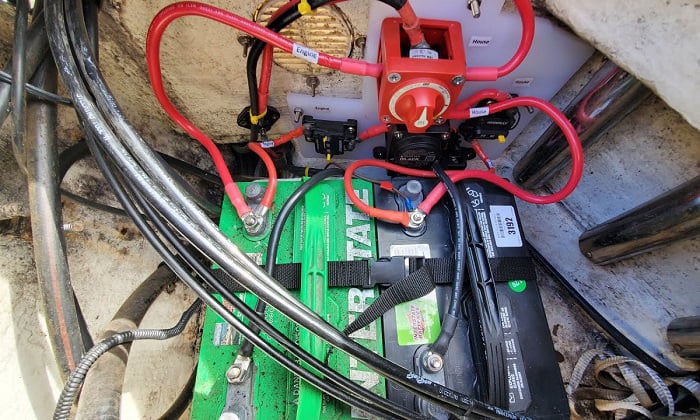
Step 2: Connect the boat’s second battery
The installation should meet local requirements. But the battery box should be used to store wet-cell batteries. Meanwhile, absorbed glass mat batteries don’t require any packaging. Both require tie-downs or brackets, and non-conductive boots should be used to cover the positive terminals.
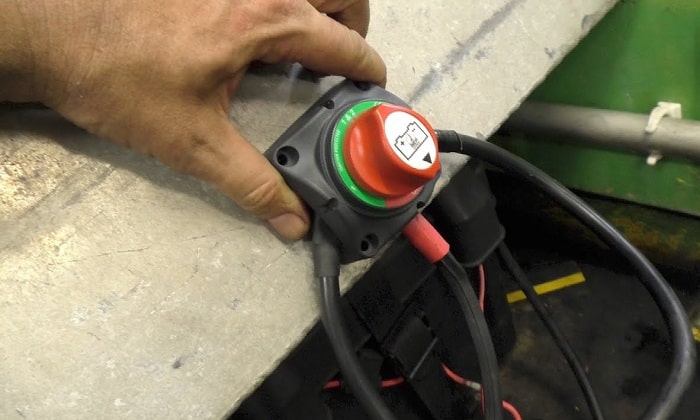
Step 3: Choose a surface for the battery switch on your boat
Since selector switches have a four- to six-inch-wide footprint, choose a surface with adequate room. The switch must be as near to the batteries as feasible and easily accessible, according to common regulations. It may be flush-mounted above decks for a cleaner appearance but ensure it’s shielded from the elements. Wait until the positive wires are attached to the connectors in the rear before finishing the installation.
One of the simplest tasks is to wire a twin battery switch. You may use batteries with the dual switch for your battery cells. This will keep your batteries active and prevent them from stalling.
You must also:
- Ground both batteries in the engine’s common ground while connecting the two batteries.
- Connect one battery to a single ground wire, and the second battery to the other wire for adequacy of installation.
- Check that the engine block’s ground wire can carry the current from both batteries. As a result, a second connection to the new battery will be preferable.
- The cells must be able to slide into the insulated terminal post cover.
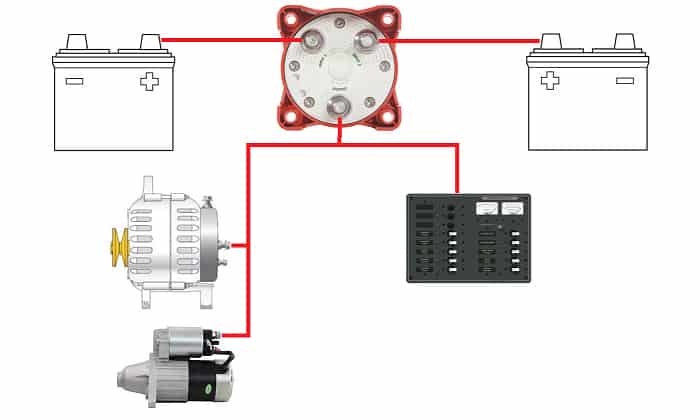
Step 4: Join the positive and negative cables
All insulation covers or insulating materials must bear or imprint the term “marine cable.” It will help in the proper connections of both positive and negative cables to their terminals. Handle most outboards and gasoline inboards with a size 2/0 cable.
Connect the positive connections of batteries one and two to the rear of the switch’s respective posts. Then, connect the positive wire from the engine to the switch’s output post. Safely connect the output post to the positive auxiliary wire as well.
Step 5: Connect the negative cables to the positive cables.
A crossover linking the negative connections of the two batteries is required for the double system to function correctly. Also, join the engine/ground negative cable lug and the negative auxiliary wire to one of the negative battery terminals, and tighten all terminal screws.
You can appreciate more wiring demonstrations on this YouTube video from Reel Life Fisherman to enhance your battery installations.
Last thoughts
Now that you have read and understand each step on how to hook up two batteries in a boat diagram. You’re completely prepared to carry out the procedure in an easy and simple way. Remember each step to ensure your boat battery never dies while on a boating excursion.
It’s a wonderful idea to add a secondary battery to your boat though. Doing so will increase the power of your vessel to its optimal performance. Instead of having only one battery, you will now have the power of two and be able to go on longer boating activities.

“I am James Harvey – founder of Boating Basics Online. It is established with the drive to help out first-time boaters, which are those desiring to explore their way through the water. So if you are new to boating, start from here with me. “