
There’s no shortage of boat fuel gauge issues people face regularly. I’ve lost count of the times I’ve been asked how to wire a fuel gauge on a boat. So, here’s a more comprehensive guide for fuel gauge wiring.
I’ve also thrown in a couple of troubleshooting pointers and brief explanations of the importance of each wire in how your gauge functions. I used simpler language so everyone could understand this normally technical task.
Table of Contents
A Few Pointers Before You Start Wiring

Let’s make one thing clear first: Not every fuel gauge has the same installation setup.
For example, certain products I’ve come across, such as the digital fuel gauges made by Geloo, don’t mark where their wires are supposed to connect (whether + or -).
Those are important elements in this guide. That’s why if you still have the original wiring instructions for your specific fuel gauge, then I highly recommend you check those out first before relying on other references.
There may be other wiring steps you need to do, such as requiring you to install additional wiring for backlights. The wiring diagrams may differ as well. For reference, here’s a wiring diagram of a Moeller fuel gauge:
Here’s another diagram from the same company:
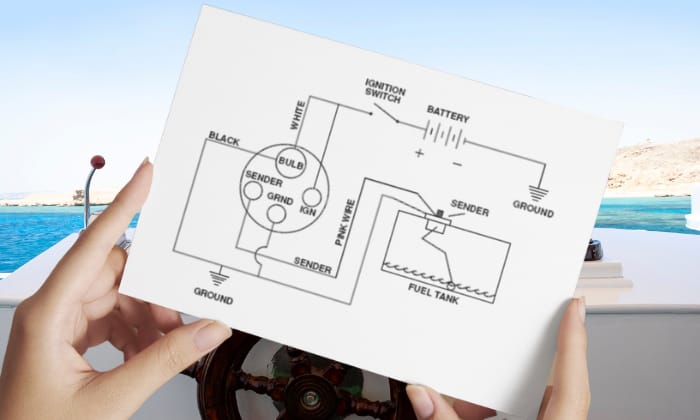
Can you spot the difference? This is why in this guide, I’ll only be expounding on the most essential wires for the sending unit, ground, ignition switch, and their respective terminals.
Prepare the Following
When you install a fuel gauge, you will need more tools like screwdrivers or even drillers to accommodate the sending unit. I’ve opted to skip adding those since this tutorial will be dealing solely with wiring.
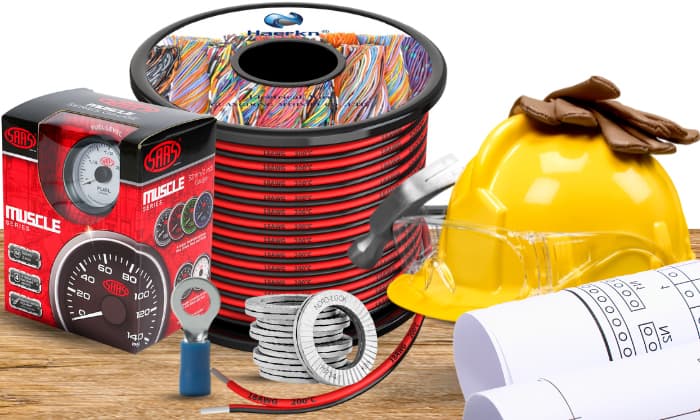
With a boat fuel gauge kit, you likely won’t need to buy some of the important items in this list, such as the wires:
- Fuel gauge
- Right-size stranded wires (at least 18 AWG or what the manufacturer recommends)
- Ring terminals
- Nut and lock washers
- Wiring diagram (for your specific fuel gauge)
- PPEs (safety glasses and insulated gloves)
Wiring a Boat Fuel Gauge
Now, I’m going to assume that you’re in the part where you’ve mounted the gauge and are ready to wire the fuel gauge.
Let’s say, you’re installing a new unit or replacing certain wires because the old ones have been cut or damaged.
Step 1: Check the wiring diagram then disconnect the battery when you’re ready.
Put on any PPE you have because safety first always! And make sure to disconnect the battery.
Then, identify the colors of the wire (black, pink, red, white, etc) to know where to connect each wire.
With a good diagram, you shouldn’t really have a hard time every time you wire a marine fuel gauge. Most of the problems people have are mostly with wires not being properly labeled or color coded.
More often than not, this happens to people who buy an aftermarket fuel gauge. If that’s the case for you, take the time to call the store you bought that unit from or any parts dealer who may be familiar with it to confirm.
Step 2: Start connecting the wires to their appropriate terminals.

Most of the wires are color-coded and/or marked in various letters, such as in the case of terminals, to dispel any confusion that may arise. In most products, I can safely say that these are the standard markers:
- “S” stands for the sender unit, and it’s assigned a pink or yellow color.
- “I” stands for the ignition switch, which is colored white. It’s often connected to the gauge’s lighting as well, assuming it has one.
- “-” stands for ground, which has a black color.
- “+” stands for power, which comes in various colors.
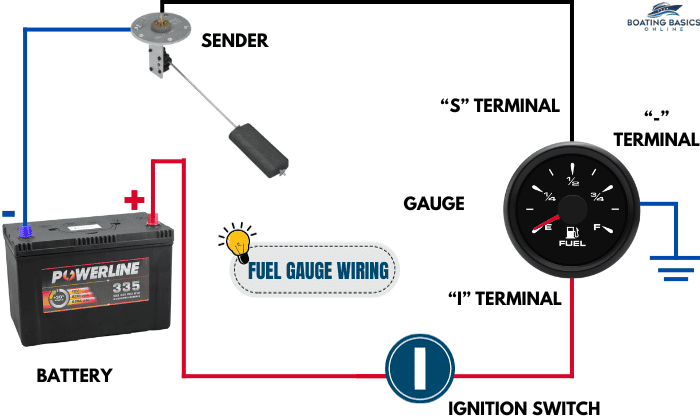
Here’s how a basic, common wiring setup goes:
- From the fuel tank’s sending unit post, connect the pink sending unit wire to the “S” terminal of the gauge. Most kits come with ring terminals which you can use to splice or hook the wire onto the said terminal/post.
- Connect the “-” black ground wire from the fuel tank to the ground terminal on the gauge. Often, the ground wire of the battery should also be connected to the same post, so do that if the manufacturer’s instructions state that as well.
- Connect the “+” power wire to the ignition terminal on the fuel gauge. From there, all you need to take care of is the wiring for the backlights. Usually, units require you to attach a jumper wire from the ignition terminal to a flat post.
- And, that’s it, really. To test if your wiring is correct (assuming there are no issues with the gauge itself), you can try attaching and detaching the sender unit wire. Be sure to hook up the wired fuel gauge to a power source first.
If it’s hooked properly, the gauge should accurately read the present fuel levels. Obviously, if the tank’s full, the needle should point to full. But if it points to empty, even if the sender unit is attached, you may not be hooking it properly.
Here’s a visual reference of what I’m talking about:
Note: Don’t overlook the ground connection because a poor connection from either the battery or fuel tank to the fuel gauge may disrupt the flow of current and, in turn, affect gauge functionality.
Conclusion
I hope that with these instructions on how to wire a fuel gauge on a boat, I’ve cleared up any cloud of doubt you have regarding this topic. Most gauges have a straightforward wiring layout.
I get that this is not always the case for every product. The point this guide wants to make is that these are the steps where most fuel gauge products overlap. In the end, there’s nothing better than instructions that come straight from the makers themselves.

“My intention from the first day establishing Boating Basics Online is to provide as much help as possible for boaters who want to experience a first safe and convenient trip. So feel free to join us and share your beautiful journeys to the sea!”