
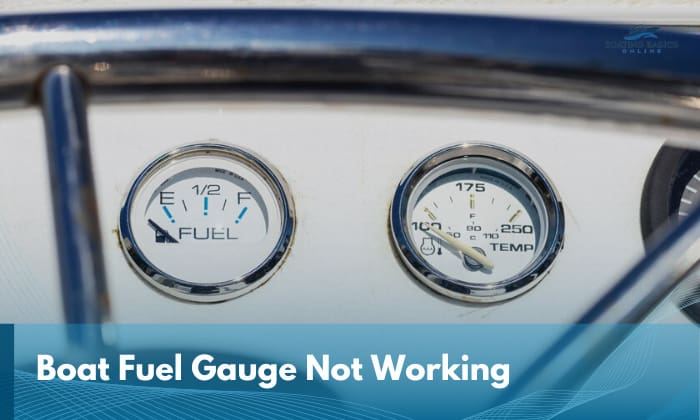
A gas gauge is a device that tells you how much fuel you still have based on various resistance changes its sender unit detects. If the issue of the boat fuel gauge not working arises, you’ll see symptoms such as its float arm being stuck on empty or full, fluctuating, not working altogether, etc.
A broken fuel gauge is challenging to remedy because it can be caused by numerous things, such as damaged fuel gauge wiring or a faulty sending unit. Other culprits include wear and tear and grounding problems.
In order to know how to tell if a boat fuel gauge is bad, you need to learn how it works in greater detail. So read on!
Table of Contents
Troubleshooting and Fixing a Boat Fuel Gauge
Below are the best ways to test a fuel gauge on a boat without requiring any advanced technical skill. By determining the root causes, you’ll be able to figure out the best way to fix fuel gauge on boat.
1. Test the Fuel Sender
Diagnosing any problem related to boat fuel gauges requires you to be aware of one important fact: Most hitches are caused by the sending unit or fuel sender in the tank, which is usually why any fuel gauge on a boat is not working anymore.
The takeaway here is: you’ll need to test the sender unit’s resistance to determine whether it’s defective, in which case replacement is necessary.
When doing any test, you’ll need to remove the gauge’s fuel sender first. Where it’s located depends on the type of boat or model you have, but most manufacturers place it in the middle of the boat.
Here’s how the test usually goes:
- Figure out how to remove the sending unit from the tank by referring to the manufacturer’s manual and disconnecting the wires.
- From there, set a multimeter to the lowest ohm setting to check the fuel sender’s resistance.
- Use the multimeter’s black probe to ground the sending unit, then touch the end of the power wire with the red probe.
- Move the sending unit’s float across the arm to start checking. Its resistance reading should increase as you move the arm closer to the unit’s body and decrease as you pull it away.
- The ideal sending unit’s resistance will vary from one model to another, so you’ll have to check your boat’s specifications. If you can find none, just make sure the resistance changes according to the float’s movement.
- If you’re not getting any resistance or the reading doesn’t change according to the float’s movement, it’s likely that your sender unit already needs to be replaced. The same applies to the instance where the reading is outside the recommended range.
2. Test the Fuel Gauge

What if the method above didn’t solve the problem (e.g., still stuck on full, stuck on empty, or drops below empty)? If that’s so, I suggest you examine its needle.
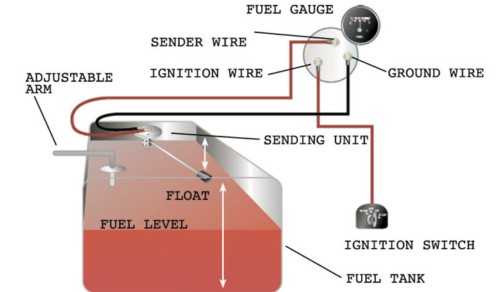
Take note of this before handling its wiring, though: Typically, a fuel gauge installation will have three wires connected to the sending unit, namely a ground wire (black), a sender wire (pink), and a power wire (either purple or yellow).
- Disconnect the sender wires and ground wires attached to the sender unit, then turn the key to the ‘On’ position.
- Afterward, touch the two wires together. Once you do, the gauge’s needle should jump to ‘Full,’ which is a sign that it’s still good to go, as well as most of the wiring.
What if the needle doesn’t spike? You’ll need to do a simple voltage test on the gauge or the sending unit’s wires, to be exact.
- Set the multimeter to measure voltage.
- Touch the probes to the ground and power wires attached to the terminals on the back of the fuel gauge. You should at least get a reading of 12V.
- No voltage spells trouble, especially if there are no issues with the power source, wires, or fuse.
3. Test the Gauge’s Assembly
If your gauge’s needle is stuck on the ¾ mark or you encounter this issue after a battery change, there’s a chance it is stuck, or something is causing it to snag on other parts of the tank.
If this is the case, you can usually adjust the orientation of the swing arm and float by loosening the nuts on top of the sending unit in 90-degree turns.
What to Keep in Mind While Testing Boat Fuel Gauge
When doing any of the wire tests, you need to account for the fact that not all gauges are the same nowadays. For example, you may have a digital fuel gauge system with a different wiring rig than others.
Refer to official documentation and a wiring diagram before doing any test procedures or boat fuel sending unit repair involving them to be completely safe and sure.
If the result on the multimeter fluctuates or is not reading correctly, it may be time to replace it or have a professional check, repair, and replace the unit for you.
Conclusion
We all need to accept that the problem of the boat fuel gauge not working is fairly commonplace. It’s also a hurdle that needs to be addressed seriously because how else will you be able to know whether your boat still has enough fuel or not?
Again, most problems stem from a defective fuel sender or improper wiring, so don’t hesitate to try doing the tests shared here. If you’re not confident with your technical skills, just let a pro handle it.

“My intention from the first day establishing Boating Basics Online is to provide as much help as possible for boaters who want to experience a first safe and convenient trip. So feel free to join us and share your beautiful journeys to the sea!”