
Boats are excellent subjects for drawing because of their beautiful shape and how good they look with nature in the background. However, many people may find themselves struggling to decide how to draw a fishing boat.
Here, we have two drawings of fishing boats, one simple and the other more detailed. We’ll draw a boat step by step for each type while keeping things as simple as possible.
Keep reading to learn more.
Table of Contents
What You Need

- Paper
- Pencil
- Eraser (to make corrections to your drawing if necessary)
- Markers/crayons (optional)
Simple Fishing Boat Drawing
Clip art fishing boats are great when looking to draw a boat for kids, as they are very simple in appearance.
- Step 1: Sketch the hull first using a shape that looks like an upside-down roof. You can start with two horizontal parallel lines and draw an angle from the top end to the bottom end of each side.
- Step 2: Draw a large triangle on top of the hull. Draw in several boxes on the triangle. These will be our sails.
- Step 3: Add details to the hull using thicker outlines and horizontal lines on the body that look like wooden planks making up the hull. Put in additional details such as an anchor and fishing equipment like nets and lines.
- Step 4: Add masts behind the sails and a more solid outline for each sail. Replace the side of the sail boxes with curves to imitate how the wind pushes them forward.
- Step 5: Emphasize the final lines and remove the starting line guides to finish. Add color for a better look.
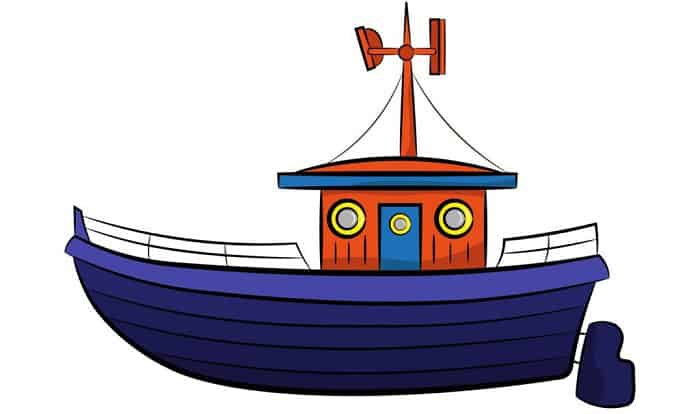
Detailed Fishing Boat Drawing

If you want a boat to draw that looks more detailed, try making this fishing boat sketch. For this art piece, we’re going to be drawing from the right side. The boat will lean down somewhat on the left.
Step 1. Draw the bow line
On the right side of your paper, draw a curved bow.
You can make use of an imaginary horizontal line where you will start drawing the bow. This will be a good way to provide some reference as to where your boat is facing. Keep this line light as you’ll be erasing this later.
Step 2. Begin the outline of the hull
Draw a horizontal line beginning from the lower end of the bow line. This will be one side of the gunwale and will determine the view angle from which we are seeing the drawing.
For this situation, draw a straight horizontal line if we want to be looking from the side.
Change this to a rising or falling angle if you would like to see the boat slightly from the front or back. However, this would make it necessary to also change the bow if the change in angle is too much.
Also, add a vertical line from the same point where the horizontal line began. Add a very slight angle to the right as you draw down to show the curve of the hull.
Step 3. Add the transom
Draw the line for the transom starting from the end point of the gunwale line. What’s very important to note is that the angle of this transom must be the same as that of the cabin’s top line, which we’ll be adding in the next step.
If these two angles are different, the entire boat will end up looking twisted.
On each side of the transom, draw two short vertical lines and add one more line in the middle for added detail.
Step 4. Add the cabin
Begin from the upper end of your bow and make a short horizontal line with a slight upward angle; this will be the top of our boat’s cabin. Be sure that the angles for the transom and cabin top match, as mentioned above.
Make three short lines downward coming from the top cabin line, with the center line closer to the one on the right and slightly longer. We will end up with a cube-looking figure.
You can also add in a window and door to have a better idea of the look you’ll be getting.
Now that the cabin has an outline, draw in the gunwale line for the top side beginning from the cabin’s right-most vertical line to the transom.
Step 5. Put in the bottom details
At the bottom of the boat, we have the keel and usually a rudder at the back. Start adding these details if you will want them. However, these won’t be visible when you draw a boat on water.
If you want your boat on the water, draw more details for that instead, such as splashing water or just calm waters.
If you are drawing the bottom, start with the rudder below the transom using a simple standing rectangle with its top and bottom at a slight downward angle to match the rest of our drawing.
Next, start extending the transom from each of the vertical hull lines. You’ll have the shape of the boat.
Also, add in the keel by drawing slightly curving lines from the transom and the front of the hull.
Step 6. Characterize your boat
Add more details to the boat with some shading. If you’re showing the bottom, establish a waterline for that as well and shade the bottom to show some variation. Add items such as fenders on the side of the hull as well to make it more lifelike.
At the back near the transom, draw a mast; this is where we’ll be able to put in the necessary details for fleshing out our fishing boat, such as nets. You can add in the details you want at this point.
Other details you can add are mooring lines, an anchor, or fishing equipment that may be hanging at the rear end. Define your outlines and add color if you’d like.
Conclusion
Now you have a better idea of how to draw a fishing boat. Change the details on the boat and you can have different kinds as well. The great thing about boats is how accessible they are once you become familiar, so keep practicing.
If you have any comments or suggestions you’d like to share, please don’t forget to leave your message below. We’ll be waiting to hear from you.
Remember to boat safely.

“My intention from the first day establishing Boating Basics Online is to provide as much help as possible for boaters who want to experience a first safe and convenient trip. So feel free to join us and share your beautiful journeys to the sea!”