
If you have any lingering doubts about whether you can learn how to repair boat gelcoat, let me assure you now that it’s not hard at all. It just takes some solid know-how and elbow grease.
This guide assumes that the damage is only limited to the gelcoat and not the fiberglass or resin underneath it. It will teach you the entire DIY gel coat repair process that works for minor chafes and tears and makes your vessel as good as new in that regard.
Table of Contents
Ready These Tools
- Gelcoat resin with the appropriate color
- Gelcoat hardener (MEKP)
- Cleaning rag
- Mylar paper
- PPEs like gloves, a mask, and eyewear
- Acetone
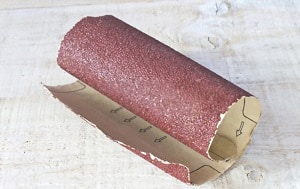
- Sandpaper (at least 220-grit)
- Measuring tool for gelcoat and hardener (e.g. syringe)
- Paint stick
- Gelcoat sprayer (optional)
- Mixing container
- Cordless grinder (optional)
You can skip buying most of these tools separately if you decide to go for a boat gel coat repair kit. However, I find I seldom get my money’s worth with them because I end up not using some of the items included.
Follow These Steps and Tips
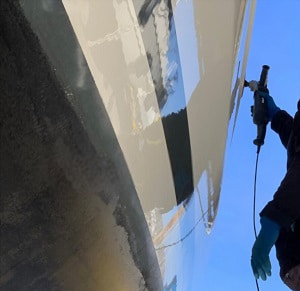
Step 1: Freshen up and smoothen the damaged area
Check the damage carefully. If there are prominent bumps and irregular edges in the damaged gelcoat, then you may need to smoothen them with a cordless grinder or manually with sandpaper.
Doing this helps the newly applied gelcoat adhere and fill out the void better. This step is necessary if you’re seeing plenty of loose, chipped areas because the new coat may end up cracking sooner than later, and you’ll have to start over.
- The key to smooth, easy, and great fiberglass gel coat repair is to be able to apply an even coat from the get-go. Tapering down and leveling the edges of the damaged portion helps to ensure you’ll get that result.
This works regardless of where the damage on the hull is, whether below the waterline or above it.
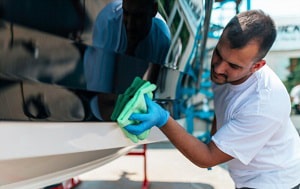
Once you get it to a cleaner, smoother state or find that there’s not a lot to level, that’s the time to start cleaning the damaged area. The sanding you performed likely produced a lot of dust.
Start with a wet cleaning rag and give it a good wipe-down. Grab a fresh rag then dab it with a small amount of acetone – just a few drops will do the job.
Clean any remaining residue on the damaged area. The acetone also helps to remove the moisture quickly for optimal gel coat adhesion.
Step 2: Mix the gelcoat resin with the hardener
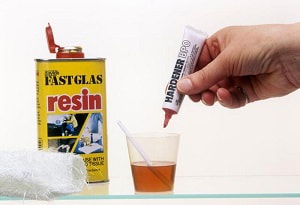
Follow the instructions for mixing both. You need to get the amounts right, as adding too much may cause the solution to cure too quickly that it becomes difficult to manage.
Every time I’m repairing gelcoat on the boat, I often bring along a large syringe to make measuring a cinch. I recommend you do the same if you’re planning on repairing gelcoat cracks and chips more frequently.
Use the paint stick to mix the resin and hardener thoroughly.
- Take note of the temperature in your work area. If it gets too hot, you may have less time to work with it before it cures completely.
- Mixing larger gel coat resin amounts at a time also paves the way for that problem to arise. That’s why I recommend you mix small, thin batches.
Step 3: Apply the gelcoat then cover it with a piece of Mylar paper
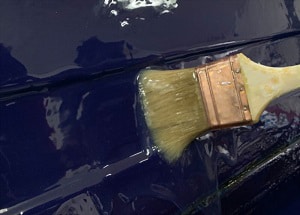
From this point on, you’re going to be doing the actual repair. Properly dabbing and filling the void on the bottom of the boat mainly depends on how comfortable you are with a particular application tool.
If you like using a paintbrush or gelcoat sprayer, then go ahead and use it. I like using the paint stick, especially on small-area repairs, since I find it easier to get the resin where I need it to be. It’s your choice.
Apply a heavy coat as much as possible without spreading the resin on undamaged parts. Use masking tape or any other applicable protective material to prevent it from spreading, especially if you’re using a sprayer or paintbrush.
- Once you’re done filling the damaged area, put a piece of Mylar paper over it. This helps to smoothen and improve overall curing so that you won’t have to do a lot of sanding just to keep the new gelcoat level with the original.
Step 4: Wait for the gelcoat to cure a bit
Don’t let it completely harden. Once you reach that point, you’ll have to sand it again.
You’re aiming for a consistency that’s dry to the touch but with a palpable tackiness still remaining.
- If you think you need one more coat in anticipation of the sanding job afterward, then go ahead and apply a second coat or even a third one, as long as you apply it on the previous coat that has the consistency I mentioned above.
- Assuming you used the Mylar paper, a single heavy coat will do in most cases.
From there, it’s a matter of waiting for the new gelcoat to completely cure and dry.
Step 5: Finish it off
Whether you can do this on the day you applied the gelcoat or the next depends on the weather. If it’s hot, the coat may dry on the same day.
You want the resin to feel fully dry before sanding it. You can use 1,000-grit sandpaper if you want to really get the surface nice and smooth, but 220-grit works just as well.
Anticipate that the Mylar paper has done its job and you won’t be applying too much elbow grease to get a smooth, level finish. Plus, you can always use a sander, assuming it’s available, but I prefer to do it by hand since it tends to leave fewer or no trails at all.
- Be sure to keep your sanding area restricted only to the one where you applied the new gelcoat.
- It’s all a matter of keeping the repaired area free from bumps and even with the surrounding original gelcoat.
Helpful Tips/FAQs
Tip When Matching Gelcoat Colors
If you want to restore boat gelcoat to its original color finish, you need to inquire about the exact color for your vessel based on its year, model, and make. Feel free to contact the bass boat manufacturer about it because they may be able to provide you with the original gel coat directly.
Otherwise, you can always use a gel coat colorant. This 3-minute video explains how you can use one:
How do I know when to repair a gelcoat crack?
This is great to know as you can confirm whether you need to fix gelcoat on boat or opt for a more comprehensive solution. Any noticeable superficial cracks, wear, and tear need to be repaired.
If the damage becomes too extensive and involves the fiberglass resin below, you may want to consider doing a complete makeover. This may mean you’ll have to replace boat gelcoat altogether.
How much does gelcoat repair cost?
It’s definitely far more expensive than opting for a DIY route. Boat gel coat repair cost is determined on a per-foot basis. On average, this could be $400 for every foot of damage.
The labor involved makes up most of the total cost. Now, do you see why a lot of boaters are curious about doing gelcoat repairs by themselves?
Conclusion
Bumps, scratches, and gouges tend to be inevitable the more you take your boat out. As long as you know how to repair boat gelcoat, these minor damages shouldn’t be a hassle in more ways than one.
Just follow these steps every time you discover minor superficial flaws on your vessel – even better if they’re just starting out and are still in the manageable stage.
More serious keel gelcoat repair requires professional help, though.
Read more: Marine vs gelcoat paint: Which is better?

“My intention from the first day establishing Boating Basics Online is to provide as much help as possible for boaters who want to experience a first safe and convenient trip. So feel free to join us and share your beautiful journeys to the sea!”