Table of Contents
Easy Step By Step Guide to Tie Your Boat to a Dock
- Place your fenders
- Attach the docking lines to the boat
- Tie the bow and stern lines
- Tie the spring lines
Caring for your boat is something that should warrant much thought. After all, your boat is a valuable investment that you would like to keep safe.
However, mooring your boat can be a complicated affair and how to tie a boat to a dock is not a situation where you would want to be adventurous, considering how expensive it can be to have your boat repaired.
That’s why we’ve put this guide together to get you and your boat through the seemingly complicated mooring process. It’s actually easy and simple, so read on.
What You’ll Need
- Docking Lines
You will need at least 4 lines; one for the bow, one for the stern, and two spring lines. It would be a good idea to have spares though, in case any line breaks. You would also need breast lines.
Make sure to choose high-quality lines for use as docking lines. Skimping on these can be costly, and needing repairs for your boat would not be the worst outcome.
These protect your vessel from damage should there be contact with the dock or other objects. There are different types such as inflatable ones and plastic ones. I prefer using ones that are not inflatable so I don’t have to bother with extra work, but they all work the same way.
- Boat Cleats
Make sure to check that your boat has cleats for tying it to the dock. You would need cleats for the bow, the stern, and also for the aft and forward spring lines. If you don’t have cleats on your boat, install them right away.
- Dock
This is where you tie the boat. You will usually be using cleats on the dock as well, but there are instances when there aren’t any around, then you might use rings or pilings.
How to Tie Your Boat – Steps:
Step 1: Place the Fenders
You should always have your fenders placed before approaching the dock, as these are capable of absorbing contact between your boat and any other object — including the dock itself, avoiding damage to your hull.
You can place fenders on any side of the boat, even the bow or stern. Make sure to place them wherever there is the risk of contact or collision. Think of them as a sort of cushion for your boat, or even a shield of some sort.
Step 2: Attach your docking lines to the boat
Make sure that the lines are attached to the appropriate cleats on your boat. The stern line should be attached to the back portion of the boat, and the line for the bow should be attached to the front side cleat.
Be sure to secure the spring lines as well.
Step 3: Tie your bow and stern lines to the dock
Your bow and stern lines should be attached to points that are a bit away from your boat, but not too far away. Keep the length long enough that your boat does not get too close to the dock.
There is usually one of three things available on a dock to tie your boat to; cleats, rings, or pilings. We have a couple of useful knots for tying boats to docks below, along with how to tie them.
Step 4: Attach the spring lines
As for your spring lines, the aft line should go toward the back and the forward spring line toward the front of the boat. These help keep your boat stable, and not having these lines could make your boat prone to rocking and swaying, which could be dangerous in rough weather conditions.
Knots for Tying Boats to Docks
Knots are important to know for boating, and some of them are especially useful for tying up a boat to a dock. The most important thing is that you use the right knot so it can hold down a boat and keep it secure.
We won’t cover all the knots, but below you’ll find two simple but extremely useful knots that you can use to keep your boat tied to dock.
Cleat Hitch
The Cleat Hitch is one of the most important knots in boating, and one of the reasons is due to its use to tie boat to dock. It is a simple knot that is stable and secure but also easy to undo and, as the name implies, is the standard knot used for cleats.
Steps:
- Bring your line around the base of the cleat. Begin on the far side of the cleat, the side that is farther away from your boat.
- Bring the line over the cleat then bring it under the far side horn, then back to the top. Now bring the line under the close side horn and then again to the top of the cleat.
- Make a loop with the line. The side of the loop where the end of the line crosses the rest of the rope is the front side. Place the loop on the far side horn, front side down.
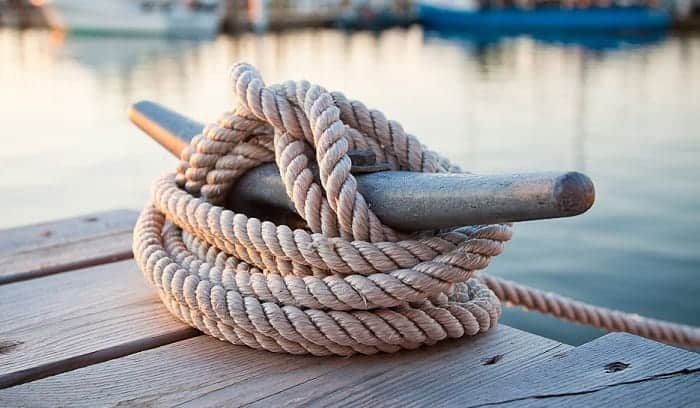
You’ll know that you tied it correctly if the end of the line is locked in place by the loop, as shown in the image above.
Clove Hitch
Another very important knot for boating is the Clove Hitch. This is a multipurpose knot and is a very useful knot to tie boat to dock and can be used for either pilings or rings. For this step-by-step guide, I will be referring to pilings.
Steps:
- Bring your line around the piling in a counterclockwise direction.
- Hold the intersecting lines together. Run the end of the line over the rest of the line and go around the piling one more time. You will find yourself having two lines running around the piling.
- Take the end of the line and bring it under and between the two lines around the piling. Pull both ends of the line to tighten.
Additional Tips:
- While it’s recommended to have at least 4 separate docking lines for stability, you can use one line that’s as long as your boat to moor with just one cleat or ring on the dock.
- It is sometimes beneficial to dock your boat at an angle.
- When measuring the length of your docking lines, consider the possibility of water levels possibly rising or falling and give allowances for these possibilities.
- While the two knots we covered work well enough, it’s better to try to learn other knots to use as alternatives once you’ve gotten the hang of the knots we covered in this guide. The bowline knot is a good place to start.
Conclusion
And that’s the end of our guide on how to tie a boat to a dock. While the process of learning all these steps may be frustrating, we hope that our guide was able to alleviate the level of difficulty, if only a little.
It can be tedious to learn everything necessary, but all of that effort will be worth it once you can relax on your boat knowing you have one less thing to worry about when going boating.

“My intention from the first day establishing Boating Basics Online is to provide as much help as possible for boaters who want to experience a first safe and convenient trip. So feel free to join us and share your beautiful journeys to the sea!”


