
7-Step Guide:
- Establish the tapeline
- Sand the areas below the tapeline
- Raise the boat
- Apply a barrier coat
- Apply the boat paint
- Remove the tape
- Lower boat and paint remaining spots
Painting the bottom of your boat is essential for keeping your boat in good condition. Bottom painting your boat will protect it from unwanted growth such as barnacles that hamper your boat’s performance.
Having your paint job done by a professional is also expensive. If you’re someone who doesn’t mind getting your hands dirty, it’s a worthwhile experience to try it yourself.
So keep reading and see for yourself how to bottom paint a boat on a trailer and how simple it is. We will cover the whole process in 7 easy steps.
What You Need

- Boat bottom paint
- Barrier paint
- Paint roller or brush
- Paint tray
- Cleaning cloth (to cover the area where you work)
- Painters tape
- 80 grit sandpaper or sanding disc
- Sander
- Jack
- Boat stand – at least 4
- Cribbing or wood blocks
Safety equipment:
- Goggles
- Mask – for protection from fumes
- Gloves
- Work mat – for working under the trailer
How to Bottom Paint a Boat on a Trailer
Step 1. Establish the Tapeline
The first step to bottom painting a boat while on trailer is to use painter’s tape to create a border along the hull of your boat. This line ensures that the paint will be even and gives you an idea of the area to paint.
But how exactly do you know where to set the tapeline? There are several ways to do this, but we follow the waterline.
One easy way to do this is to leave the boat on the water for a few days. The waterline will become visible because the water will have made a change in color on the boat. Set the tapeline above the waterline and you’re all set.
Step 2. Sand the Area Below the Tapeline
The next step is to sand the surface we will be painting. Sanding is important regardless of whether the boat is new or not. Sanding will scuff up the surface you’ll be painting, which will allow the paint to set properly.
Be warned though that boat paint is toxic. If you’re sanding the bottom of your boat that is already painted, make sure to have the proper dust collection system on hand. A sander with an attached dust collector or vacuum is a good choice.
Using 80 grit sandpaper, sand the areas that you can reach. There are areas you can’t cover yet because the boat is on the trailer.
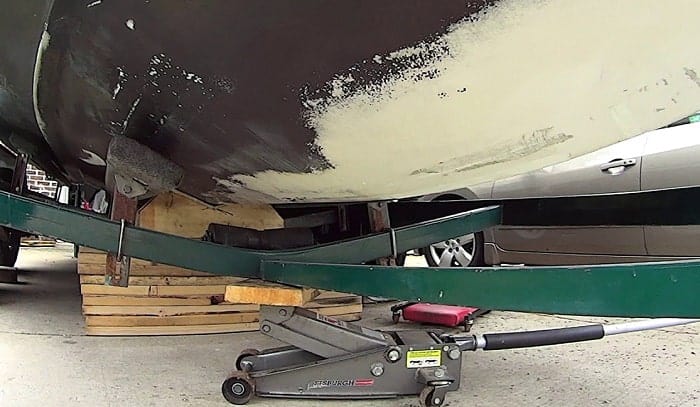
Step 3. Raise the Boat
Using a jack, raise the boat to a height of 3-5 feet above the ground. While it is an option, we won’t bother with removing the trailer below the boat. All we want to do is to be able to reach the previously inaccessible spots.
Start raising the boat from the stern, as this is the strongest section of the boat structurally. After reaching the desired height, use two boat stands to keep the boat in this position.
Next is to start raising the boat’s midsection. The key is to raise it gradually. Use your wood blocks or cribbing to cradle the boat at the keel; this also serves as our safety should there be an accident with the jack. You should support the boat with cribbing on at least two spots.
After raising the midsection to the desired height, use two more boat stands for each side. Don’t forget to support the bow with another boat stand or two. After raising the boat, you will now be able to reach the previously inaccessible areas so complete sanding the area below the tapeline.
Step 4. Apply a Barrier Coat
Now we’ll apply a barrier coat to the hull. This will help protect the hull from corrosion and blistering. This also helps protect the hull from possible impact when loading onto a trailer and other such situations. Barrier coats also serve as good primers for anti-fouling paint, making it easier for the paint to stick.
Applying a barrier coat is simple and can be done with a brush or roller. Most barrier paints dry quickly but you should check your barrier paint’s container for the proper instructions. Things you need to look for include drying time and number of coats, though 1 to 2 coats are usually enough.
Step 5. Apply the Paint
The next step is to apply the boat paint itself. First, make sure you have the right paint. While there should not be a significant difference in applying the two types, it would serve you well to know which one fits your needs.
Apply the paint using a roller or brush as you did with the barrier coat. All you really need is one coat, but follow the instructions that come with your paint if it indicates otherwise. If you have extra paint, you can go for a second coat, though you don’t have to be able to complete the second coat.
Make sure that you have set aside enough for the spots you weren’t able to paint. These are the contact points for your cribbing and the boat stands.
Step 6. Remove the Tape
After you paint the bottom of a boat, you will have to let it dry. However, it is recommended to remove the painter’s tape as soon as you can. This is because it will become more difficult to remove the tape as more time passes.
Besides, you don’t need the tapeline anymore after the paint border has been established. At this point, it’s just the contact areas that are left to paint. Those are all near the actual bottom of the boat so the tapeline is not necessary for painting them.
Step 7. Lower the Boat and Fill the Remaining Spots
After the paint dries, you can lower the boat. Begin with lowering the front side of the boat first. Once you have set the bow on the trailer, you can proceed to lower the stern and set the boat back onto the trailer.
At this point, you should be able to access the remaining spots and paint them by getting under the trailer. Don’t forget to apply the barrier coat first, then proceed with the bottom paint. Just let these spots dry and you are done.
Pro Tips
1. How to choose the type of bottom paint to use
There are two types of bottom paint: ablative paint, and hard paint. You choose based on how you use your boat and which paint is a good fit for your use.
Ablative paint is soft paint that wears off after a while. This paint is used if you take your boat in and out of the water regularly. If you always transport your boat on a trailer, this paint will serve you well.
Hard paint, on the other hand, is hard as the name states. As opposed to ablative paint that wears away, this paint stays on the bottom of your boat and is suited for boats that stay in the water for a long time. If you take this paint out of the water, it will oxidize and lose its effectiveness in 72 hours.
Besides, you also can refer to other types of boat paints that for specific boats such as duck boat paint or paint for boat trailer.
2. Use Jacks or Boat Lift Systems for Raising a Boat
While there are boat stands with motorized mechanisms, it is not recommended to use these for raising the boat. If you are using a boat stand with knobs for raising the arm, you can use these to raise the boat but do so with much caution. Do not turn the knobs more than half a turn.
It is still recommended to use heavy-duty jacks or an actual boat lift system. However, since we‘re bottom painting boat on trailer, jacks should do just fine as we won’t be raising the boat too high.
3. Always Support the Boat at the Keel
When using cribbing, always set it to support the keel of the boat. Also, use cribbing every 10 feet beginning from the transom. This is to ensure that enough support is provided to the boat.
Conclusion
With that, we have covered the basic information you need to know on how to bottom paint a boat on a trailer. All that’s left is to try it yourself. While it may be challenging, it’s a worthwhile experience that should also save you a bit of money as well.
Did you find this guide helpful? If you did, please share it and leave your comments below. We’d love to hear your thoughts. Just be sure to boat and paint safely.

“I am James Harvey – founder of Boating Basics Online. It is established with the drive to help out first-time boaters, which are those desiring to explore their way through the water. So if you are new to boating, start from here with me. “